Entity Framework Core Migrations
In real-world applications, data models change when new features are added to the application. The model changes have to be propagated to the database to keep the database in sync with the model. Entity Framework Core migrations enable us to incrementally update the changes in the models to the database while preserving the existing data there.
Migrations are managed in Entity Framework core using a set of commands that can be executed in Nuget Package Manager Console (PMC) or in .NET Command Line Interface (CLI).
Package Manager Console can be used to get a list of valid Entity Framework Core commands. Open the Package Manager Console from Tools -> NuGet Package Manager -> Package Manager Console in Visual Studio and execute the following command.
Get-Help EntityFrameworkCore
When the above command is run in .NET 5.0, a list with the following commands will be displayed.
Add-Migration - Adds a new migration. This command will create a migration by generating code files essential to replicate the models' changes to the database.
Drop-Database -Drops the database. When this command is run, a confirmation message will be displayed asking if you are sure to perform this action.
Get-DbContext - Lists and gets information about available DbContext types.
Get-Migration - Lists available migrations.
Remove-Migration - Removes the last migration.
Scaffold-DbContext - Scaffolds a DbContext and entity types for a database.
Script-DbContext - Generates a SQL script from the DbContext. It bypasses any migrations.
Script-Migration - Generates a SQL script from migrations. The script will be generated only for applied migrations.
Update-Database - Updates the database to a specified migration.
Next, let us see how the migration commands are used to add and edit database tables.
Open the application we created in the previous tutorials, Installation of Entity Framework and Entity Framework Core DBContext. We will add a new model named Country there and update it in the database.
Add a new class file named Country in the Model folder and copy the following code there.
using System;
using System.Collections.Generic;
using System.ComponentModel.DataAnnotations;
using System.Linq;
using System.Threading.Tasks;
using Microsoft.EntityFrameworkCore;
namespace MyEFCoreApp.Model
{
    public class Country
    {

        public int CountryID { get; set; }
        public string CountryName { get; set; }

    }
}
Open the AppDbContext file and add this line.
public DbSet<Country> Countries { get; set; }The final version looks like this.
using System;
using System.Collections.Generic;
using System.Linq;
using System.Threading.Tasks;
using Microsoft.EntityFrameworkCore;
using MyEFCoreApp.Model;
namespace MyEFCoreApp.Data
{
    public class AppDbContext : DbContext
    {
        public AppDbContext(DbContextOptions<AppDbContext> options) : base(options)
        {
        }
        public DbSet<Customer> Customers { get; set; }
        public DbSet<Country> Countries { get; set; }
    }
}
Go to the Package Manager Console and run the following command.
Add-Migration CreateCountryTableOnce the command is run, two new migration files will be created in the Migrations folder, and the ModelSnapshot file will be updated. The auto-generated migration class file names start with the current date and time, and the migration name is appended to it after an underscore.
The migration file (<current Date and Time>_CreateCountryTable.cs) contains two methods called Up and Down. The Up method is responsible for applying the migration. In this case, we are creating a country table with two fields. You can see the C# code to create that table with two fields, their data types, constraints, etc., in the Up method.
The Down method contains code to rollback the migration. It contains the code to drop the Countries table.
To add the Countries table to the database, use Update-Database command. This will apply the migration to the database.
Update-Database
We have learned to add a new table to the database. Next, we can see how an existing table can be updated. Let us add a new field named CountryCode in the Countries table and make the length of CountryName field 50. We need to edit the Country Model for this.
Copy the following code
using System;
using System.Collections.Generic;
using System.ComponentModel.DataAnnotations;
using System.Linq;
using System.Threading.Tasks;
using Microsoft.EntityFrameworkCore;
namespace MyEFCoreApp.Model
{
    public class Country
    {

        public int CountryID { get; set; }
        [MaxLength(length:50)]
        public string CountryName { get; set; }
        [MaxLength(length: 20)]
        public string CountryCode { get; set; }
    }
}
Again execute the add-migration command.
add-Migration AddCountryCodeToCountry
Check the Up and Down Methods and see the changes that will be applied to the database. Then run the Update-Database command.
Update-DatabaseCheck the database table after this. You can see the changes are reflected there also.
Rollback an Unapplied Migration
Unapplied migrations are the migrations that are not updated to the database. It can be easily removed. Let us see how it can be done.
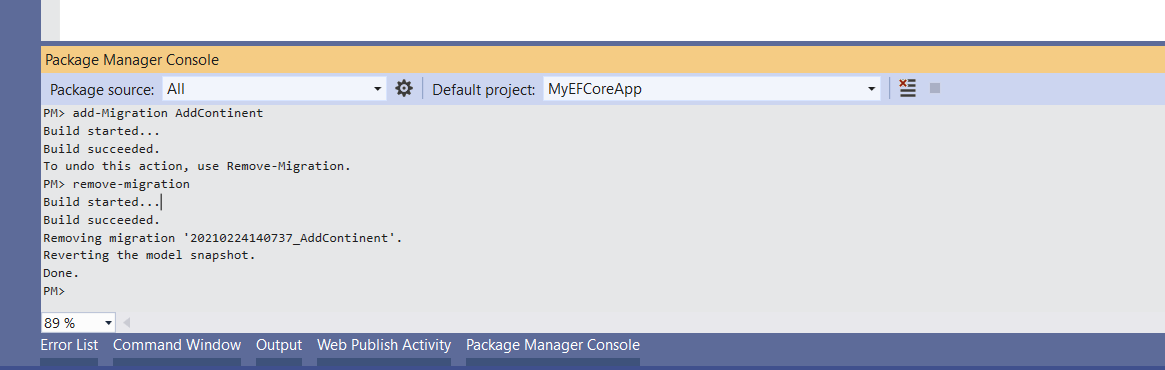
Add a new property named Continent to the Country model class.
public string Continent { get; set; }Then execute add-Migration AddContinent command. A set of new migration files will be generated, which you can check and verify. Run the remove-migration command to roll back the migration. The new migration files will be deleted. Make sure that the Continent property is removed from the class. Otherwise, it will be updated to the database the next time you run the migration commands.
Rollback an Applied Migration.
A migration that is updated to the database can be called an applied migration. To rollback an applied migration, pass the name of a target migration to the Update-Database command. In the previous example, we added a Continent property to the Country model. We are going to update that field to the database and rollback the changes after that. For this, run the following two commands in PMC, one after the other after adding the property to the model.
add-Migration AddContinentUpdate-databaseCheck the database and confirm that the content field is added to the Countries table.
To rollback this migration, run the following command.
Update-database AddCountryCodeToCountryHere, we used a migration name after the update-database command. It is the migration which we applied before the AddContinent migration. We wanted the database to go to that state by undoing the changes made by AddContinent migration. Even if the database is updated, the migration file generated is still there. To delete it, run the remove-migration command.
remove-migration